How to make your own silk screen t-shirts? Here is a step-by-step guide on how to do it:This article mainly introduces the difference between traditional screen printing T-shirts and digital screen printing T-shirts.
Traditional Process of Making Silk Screen T-Shirts
1. Gather the necessary materials:
- – Silk screen frame
- – Silk screen fabric or mesh
- – Emulsion
- – Sensitizer
- – Squeegee
- – Ink
- – T-shirt
2. Design your artwork:
Decide on the design you want to create on your t-shirt. It could be a logo, a quote, or any other image. You can either draw it by hand or create a digital design using graphic design software.
3. Prepare the silk screen frame:
Attach the silk screen fabric or mesh tightly to the frame, ensuring there are no wrinkles or loose areas. Trim any excess fabric.
4. Apply the emulsion:
Mix the emulsion and sensitizer according to the manufacturer’s instructions. Apply a thin, even layer of the emulsion onto the silk screen fabric using a squeegee. Allow it to dry in a dark room.
5. Transfer your design onto the silk screen:
Once the emulsion is dry, place your design on a transparency film and expose it onto the emulsion-coated silk screen using a light table or exposure unit. The areas covered by the design will remain unexposed. 6. Wash out the unexposed emulsion:
Rinse the silk screen under running water to wash out the unexposed emulsion. Use a soft brush or sponge to gently scrub away the emulsion, revealing the design on the silk screen.
7. Test the silk screen:
Before printing on your t-shirt, do a test print on a scrap fabric to ensure the design transfers properly and there are no defects or issues with the silk screen.
8. Print on the t-shirt:
Place the t-shirt on a flat surface and position the silk screen over it. Pour a small amount of ink onto the top edge of the design and use a squeegee to evenly spread the ink over the design, pressing it through the silk screen onto the t-shirt.
9. Allow the ink to dry:
Once you have finished printing, carefully remove the silk screen from the t-shirt and allow the ink to dry completely. Follow the manufacturer’s instructions for drying and curing the ink.
10. Heat set the design:
To ensure the design is long-lasting, heat set it by placing a clean cloth over the printed area and ironing it on high heat for a few minutes.
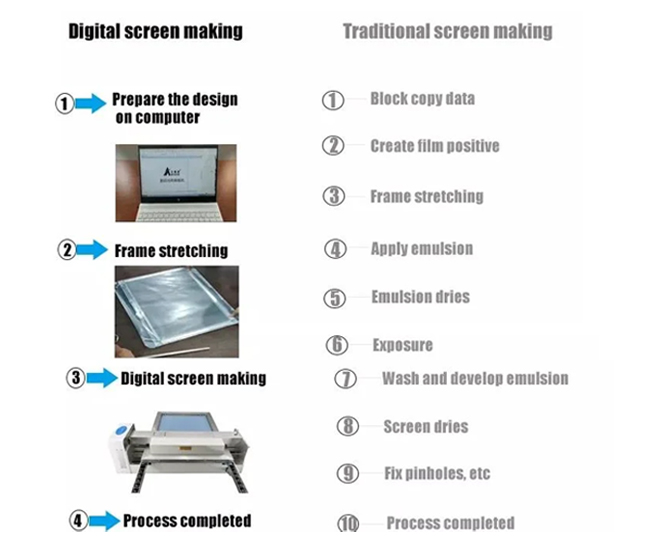
Digital Screen Printing T-Shirt Production Process
1. Design your artwork:
– Decide on the design you want to create on your t-shirt. It can be a logo, quote or any other image. Create or modify your designs digitally using graphic design software. Make sure your designs are in high-resolution format.
2. Silk screen printing:
– Digital screen printing involves the use of special printers, which is easier and faster than traditional screen printing
There is no need for film, exposure, and processing, nor for darkrooms or chemicals.
It only takes a few minutes to print the silk screen screen frame directly by computer typesetting.
3. Printing:
– The printed screen printing screen can be printed directly, just put the T-shirt under the screen frame and paint the color.
Our company is a manufacturer of T shirt screen plate making machine, which can help customers improve production efficiency. We have abandoned the lengthy and cumbersome steps required by traditional screen printing to make screens, and have found another way, using advanced digital technology, no film, no printing, no washing, no chemicals, just like using a printer, one-click commands to directly print the screen.
The advantages of the digital platemaking machine are: convenient and quick, easy to learn and use, energy saving and environmental protection, saving operating time and space, no need for professional skills, low price, fully satisfying personalized customization, proofing, and small batch production
If you want to get more details and quotation about the machine, you can leave a message to us, or contact us.
This article is about how to make your own silk screen t-shirtst, I hope it can help you.